PC Workshop user guide
This guide explains every step, from the first part to the benchmark score. The names of buttons and tabs are shown in English, because they are in English on the screen.
- Before you start
- Step 1: choose the parts
- Step 2: build on the bench
- Step 3: the first start
- Step 4: put the computer in the case
- Step 5: run the benchmark
- What to do after the first computer
- From PC Workshop to System Design Lab
Before you start
PC Workshop has three tabs at the top right of the screen. They are the three steps.
- 1. Choose Pick the parts.
- 2. Build Put the parts together on the bench.
- 3. Boot Turn the computer on and measure it.
When a step is finished, a blue button with the word Next appears. The tab for the next step also turns blue. Click either one to continue.
A first computer takes 30 to 45 minutes. With an account, your work is saved. You can stop and come back later.
Step 1: choose the parts
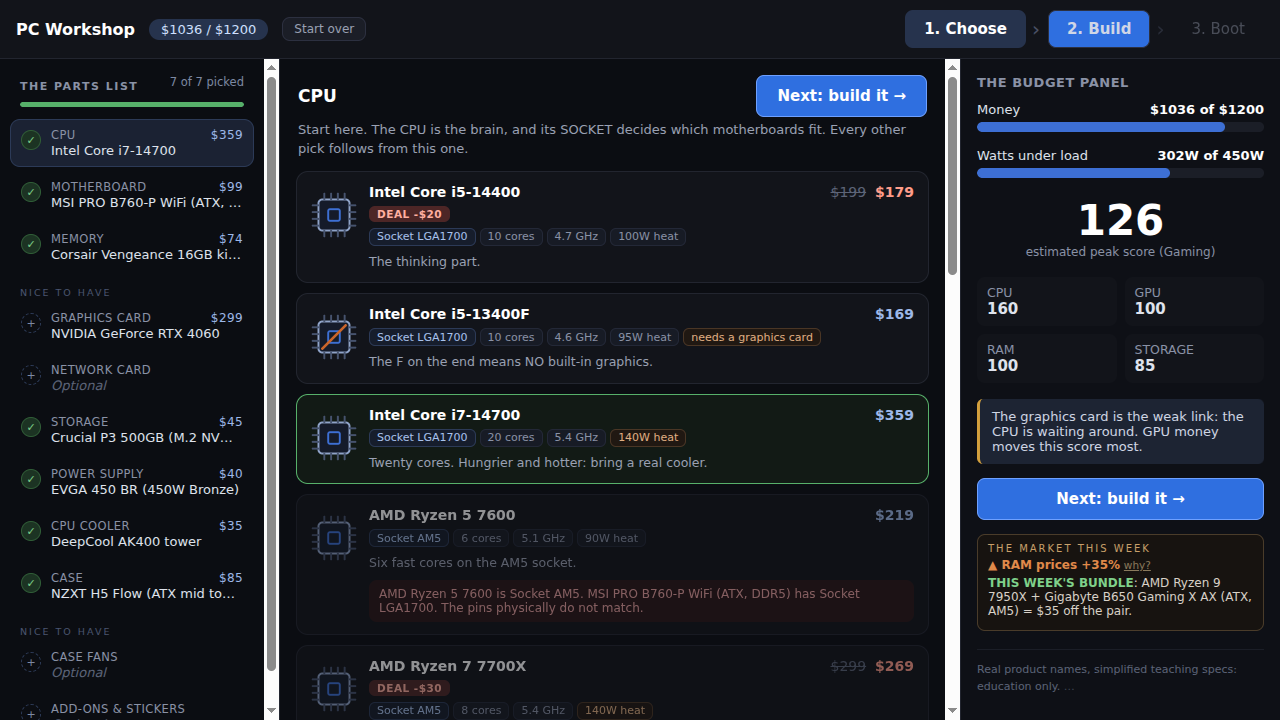
The Choose tab. Left: the parts list. Middle: the parts you can pick. Right: price, power and estimated score.
You start with a job and a budget. The job is the purpose of the computer: gaming, creating, or a home server. The budget is the amount of money you can spend.
The list on the left shows the parts you need: CPU, motherboard, memory, drive, power supply, cooler and case. You also need a graphics card when the CPU has no graphics of its own.
Pick the CPU first. After that, some motherboards turn grey. A grey part does not fit the parts you already picked. The note on the grey part gives the reason.
The panel on the right shows three numbers.
- The total price, next to your budget.
- The power that the parts use, next to the power that the power supply can give.
- The estimated score.
If the power bar is red, the power supply is too small. Pick a larger power supply.
When every needed part is picked, click Next: build it.
Step 2: build on the bench
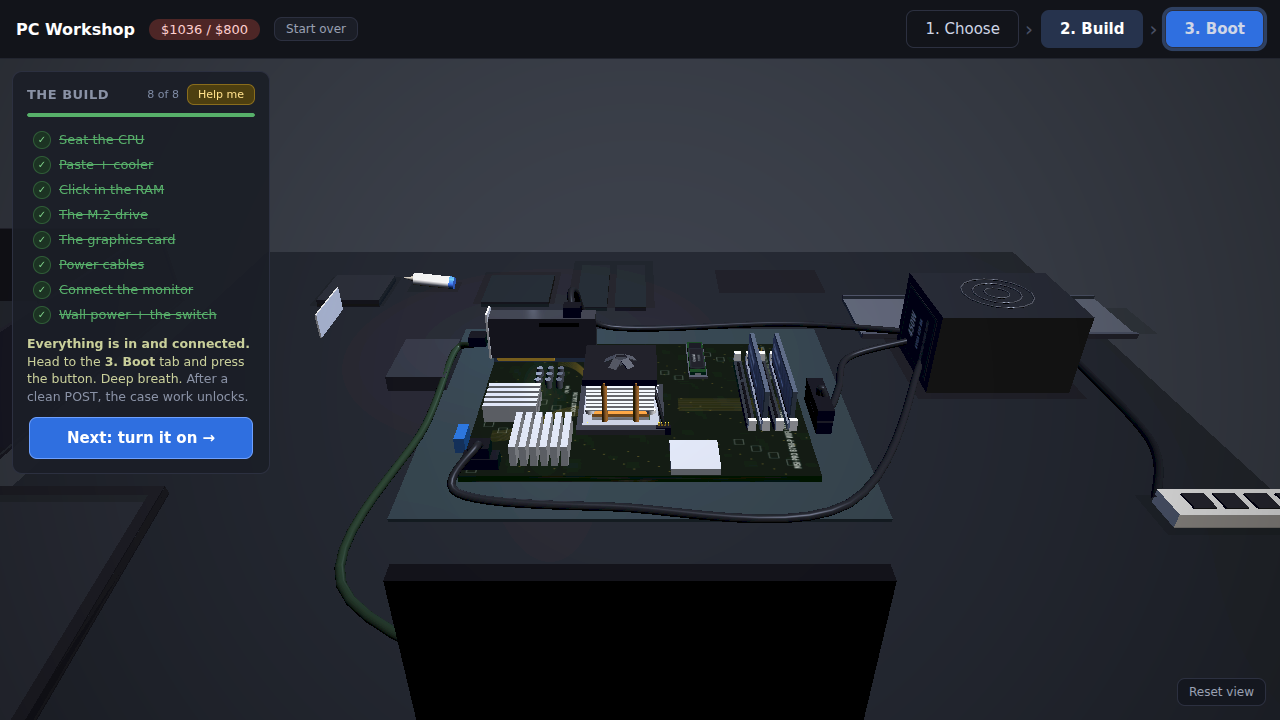
The Build tab. The list on the left shows the build steps. A finished step has a green mark.
The parts are on the bench. A gold ring shows the next thing to click. The button Help me turns the gold ring on and off.
| To do this | Do this |
|---|---|
| Turn the view | Drag with the mouse or the trackpad. |
| Move closer or farther | Scroll. |
| Slide the view sideways | Hold the space bar and drag. |
| Return to the start view | Click Reset view. |
| Take a cable out | Click the plug of the cable with empty hands. |
The steps, in order:
- CPU. Pick up the CPU. Turn the CPU until the small triangle matches the corner of the socket. Put the CPU in the socket. Close the metal plate. Push the lever down.
- Thermal paste. Press and hold on the middle of the CPU. Release when the dot of thermal paste is the size of a pea.
- Cooler. Put the cooler on the CPU. Tighten the four screws a little at a time. Move from one corner to the opposite corner. Then connect the cable of the cooler fan to the motherboard.
- Memory. For two pieces of memory, use the slots A2 and B2. Press down on the memory until both clips close.
- Drive. Fit the drive in its slot.
- Graphics card. Push the graphics card into the long slot. Fit the screw.
- Power cables. Connect the large 24-pin cable to the motherboard. Connect the 8-pin cable at the top left of the motherboard. Connect the power cables of the graphics card.
- Monitor. Connect the monitor to the graphics card. If the computer has no graphics card, use the port on the motherboard.
- Wall power. Connect the power supply to the wall. Set the switch on the power supply to I.
When every step has a green mark, click Next: turn it on.
Step 3: the first start
On the 3. Boot tab, press POWER.
One short beep means that the computer works. If the computer does not start, look at the four lights under the power button.
| Light | Check this |
|---|---|
| CPU | The CPU, and the 8-pin power cable at the top left of the motherboard. |
| DRAM | The memory. Three beeps also mean a memory problem. |
| VGA | The graphics card, the power cables of the graphics card, and the monitor cable. |
| BOOT | The drive. |
| No lights and no fans | The power. Check the wall plug, the switch on the power supply, and the 24-pin cable. |
Go back to 2. Build, repair the problem, and press POWER again. A computer that does not start is normal. Finding the reason is part of the work.
Step 4: put the computer in the case
A computer on the open bench is not finished. After the first start, click Next: put it in the case. The list of steps on the 2. Build tab continues.
- Disconnect the wall power first. Then disconnect the other cables and remove the graphics card.
- Fit the metal shield for the rear ports. Slide the motherboard into the case. Fit the screws.
- Put the power supply in its place in the case.
- Connect all cables again.
- Connect the front panel cable. Without the front panel cable, the power button on the case does nothing.
- Fit the case fans. Click a case fan to turn it around. Front case fans bring cool air in. Rear case fans send warm air out.
- Close the side panel.
Step 5: run the benchmark
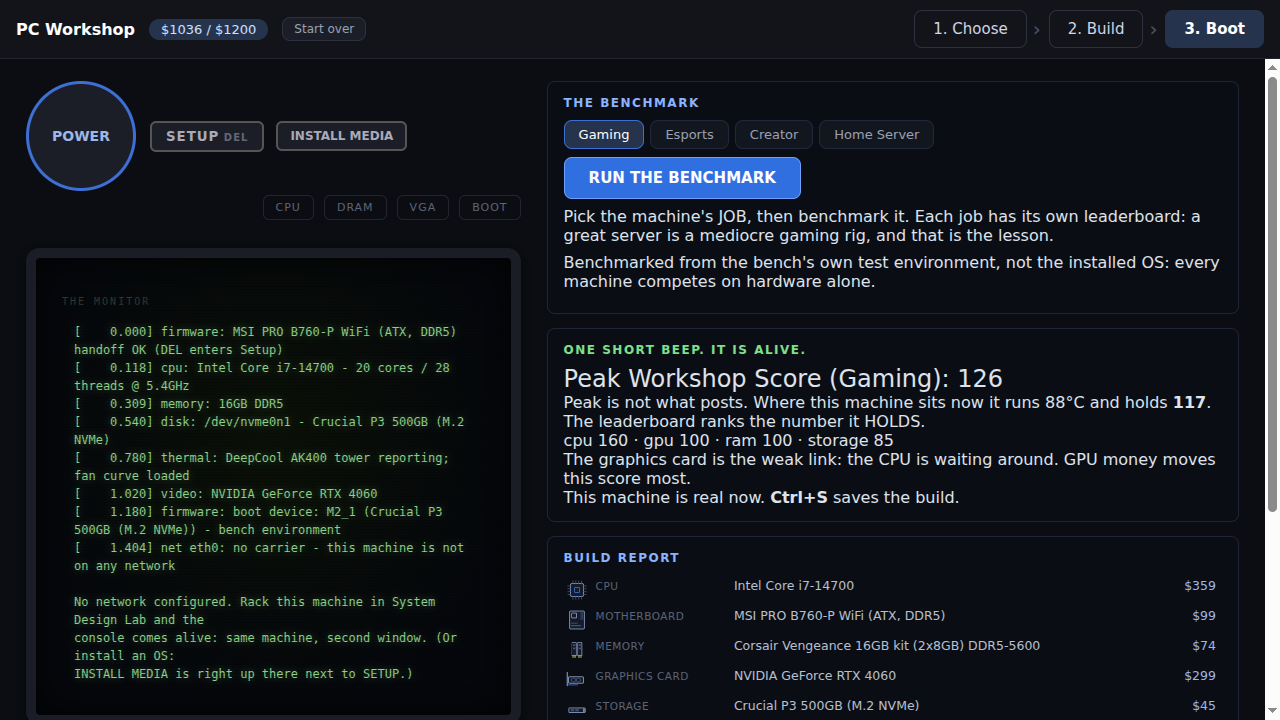
The Boot tab after a successful start. The benchmark is the first card on the right.
On the 3. Boot tab, press POWER. Choose the job. Then press RUN THE BENCHMARK.
You get two numbers.
- Peak score: the performance that the parts can reach.
- Held score: the performance that the computer keeps when it is hot. The app calls this number Sustained Score. The leaderboard uses this number.
If the held score is lower than the peak score, the computer is too hot. Add case fans, or use a larger cooler.
What to do after the first computer
| Goal | How |
|---|---|
| Upgrade a part | Change one part on the 1. Choose tab. Only that part comes out of the computer. |
| Overclock the CPU | Press SETUP and open the OVERCLOCK screen. This needs an unlocked CPU and a motherboard that allows overclocking. |
| Install an operating system | Press INSTALL MEDIA. Then follow the list under the monitor. |
| Build for a different job | Start a new project. A good gaming computer is not a good server. |
| Use the computer as a server | Read the section below. |
From PC Workshop to System Design Lab
System Design Lab is the place where students run servers: web sites, databases and load balancers. A server there normally runs on a rented cloud plan. A student can also run a server on the computer that the student built.
- Build a computer in PC Workshop. The job Home server / rack and a 4U rack case fit best. Any finished computer works.
- Put the computer in its case and run the benchmark.
- Save the project.
- Open System Design Lab and create a server.
- In the list Hardware, pick the computer by its name.
| In PC Workshop | In System Design Lab |
|---|---|
| The cores and threads of the CPU | The commands nproc and lscpu show the same numbers. |
| The size of the memory | The command free shows the size. |
| Each drive and its size | The commands df and lsblk show the drives. |
| The benchmark score | The speed of the server in a load test. |
| A rack case | The computer appears in the rack in the server room view. |
What students learn from this:
- Two servers on one computer share its speed. When a student creates a second server on the same computer, both servers get slower.
- The size of this server cannot be changed with a click. To make the server faster, the student returns to PC Workshop and upgrades a part.
- A cloud server is a part of a computer that belongs to another company.
A sequence that works over four sessions:
- Build a home server inside a budget. Compare the scores on the home server leaderboard.
- Use the computer as a server. Install a web server from the terminal.
- Publish a web site. Run a load test and write down the numbers.
- Upgrade one part in PC Workshop. Run the load test again. Explain the difference.
More help
Is something on this page wrong or not clear? Write to us.
Page last reviewed September 2026.