Plush Pattern Maker
Students who sew a stuffed animal usually get a pattern someone else drew. Plush Pattern Maker lets them draw their own. It opens on a felt cat sitting on a table; press Show the pattern and the cat comes apart into the flat pieces that are cut from fabric, laid on the letter pages they print on. Then the plush is theirs to change: its shape and size, its ears, arms, legs and tail, its face, and the fabric it is sewn from. What leaves the app is a true-size pattern, taped together from a few sheets of paper, with the seam allowance, the opening to stuff it through, and the order to sew it in. Designing and printing takes about a class period. Sewing it takes several more.
Using this with a class? Make a free class and add your students yourself: each gets a username and password, with no email or Google account needed. Or give them one join code. Using Google Classroom? Post the link there; with a free class, the link also puts each student in your class, so you see their work. mytekDev is also available from the Google Workspace Marketplace, so your school's Google admin can install it for everyone.A first lesson: Bigger or smaller? Before anyone presses Show the pattern, ask whether the paper pattern for an 8 inch plush is bigger or smaller than 8 inches. Then look at the Body tab, which gives both sizes, and talk about why stuffing pulls the cloth in.
Set up a free class Share to Google ClassroomWhat a student actually does
They open the app on a finished felt cat and turn it by dragging. Show the pattern takes the stuffing out and lays every piece flat on the pages it prints on, inside its cut line; Stuff it puts the cat back together. The Body tab has six starters: a cat, a bunny, a one-eyed monster, a penguin, an owl and a plain bean.
Body sets the shape (round, bean, pear, tall, wide or blob), the size when stuffed from 6 to 14 inches, the width, the head and the bottom, and whether it sits up on an oval base. Ears, Arms and Tail each have a few kinds, a size and a Where slider that moves the part along the edge of the body. Face has eyes, a mouth, a nose, cheeks and a belly patch, stitched with floss, cut from felt, or with safety eyes; students can also drag the face up and down on the plush itself.
Fabric is felt, fleece or cotton, and it changes the pattern. Felt is cut on the line and sewn on the outside, so it has no seam allowance and its parts can be thin. Fleece and cotton are sewn inside out and turned, so the pieces get a 1/4 inch allowance (3/8 inch when sewn by hand) and every part grows to a width that can still be turned and stuffed. The list of what to buy, and the sewing steps, change with it.
Will it sew? watches the design. A red line stops the print when two parts sit on the same bit of seam, when there is no room left for the opening, or when the pattern needs more than eight pages. An orange line points out a tight corner, safety eyes (not for children under 3), or a plush that will take a long time to sew. Print the pattern makes a first page with a 1 inch and a 5 cm square to check the printer, the pieces and what to buy, then the pattern pages, then the sewing order.
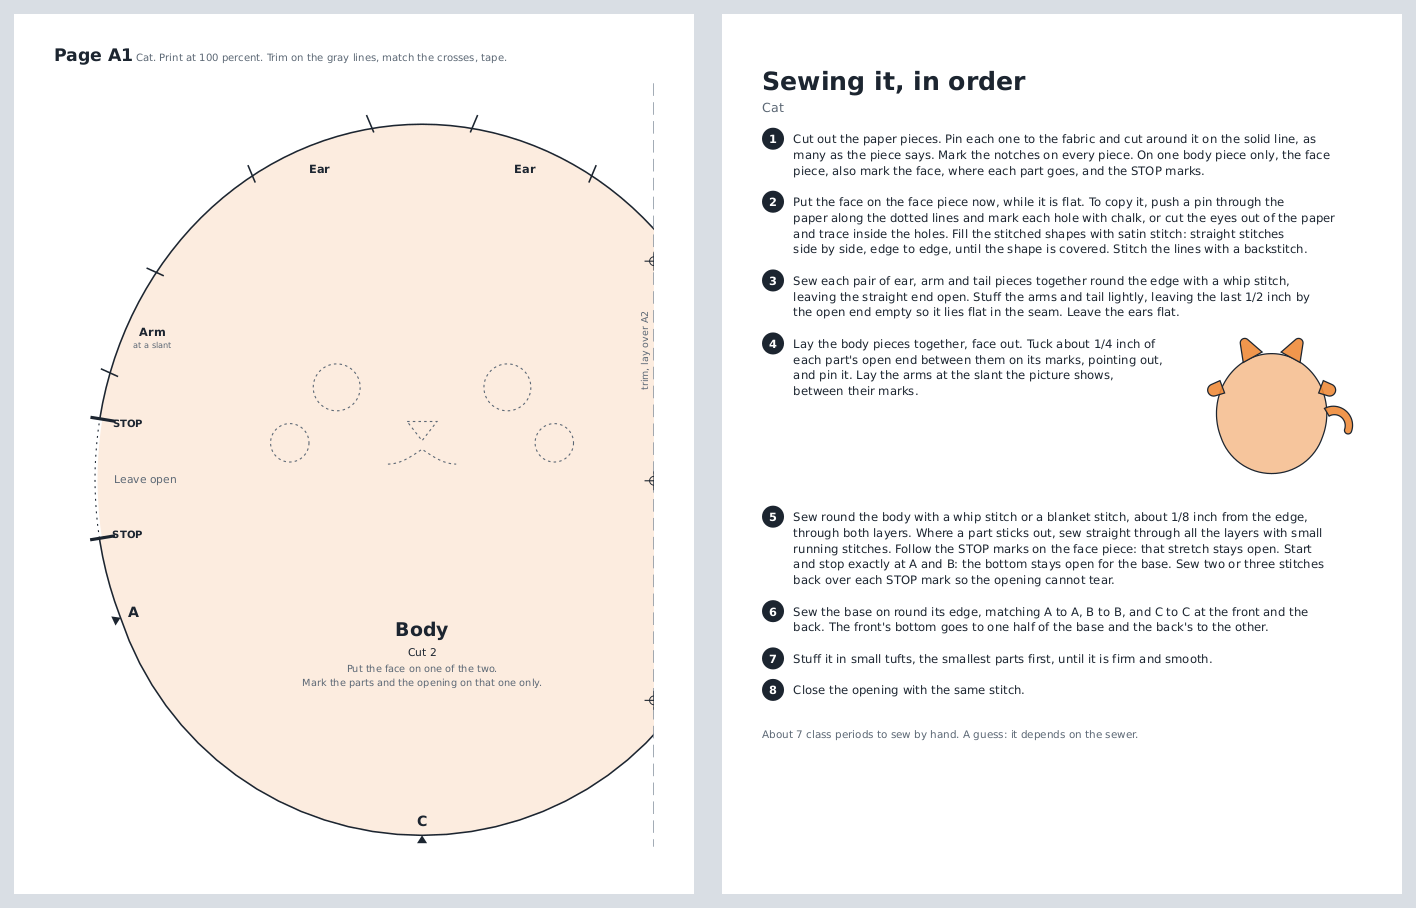
What prints. Each page shows part of the pattern at true size; students trim the gray line, match the crosses and tape. The last page is the sewing order for this plush, in this fabric.
What they are learning while they make it
Nothing here is presented as a lesson. This is what the activity is made of.
| What the student does | What it is |
|---|---|
| Reads that the 8 inch cat's pattern is almost 9 inches tall | Ease and shrinkage. A flat piece that is stuffed pulls in, more across than up and down. A pattern has to be bigger than the thing it makes. The app's numbers are a guess, which is a good reason to sew one and measure. |
| Switches from felt to fleece and watches a solid line grow a dashed line inside it | Seam allowance. The solid line is where to cut and the dashed line is where to sew. The gap between them is the seam allowance, which felt sewn on the outside does not need. |
| Watches the parts in the Steps picture point in toward the body | Sewing inside out. Fabric that is turned right side out is sewn with the parts pointing in. Sewing them pointing out is the most common first mistake, and seeing it before sewing saves a seam. |
| Gets a red line when the tail and an arm overlap | Designing to constraints. A real pattern has to be sewable: parts cannot sit on each other in a seam, and there has to be an opening to stuff through. The plush that gets printed is one that meets those limits. |
| Matches A, B and C on the base to the body | Notches and pattern markings. Pattern pieces carry marks that say which edge meets which. The base's rim is drawn exactly as long as the two body bottoms together, so the marks line up. |
How to tell whether it landed
Ask, and let them show you. A student who has understood it can answer these without help.
- Why is the pattern bigger than the plush you asked for?
- Which line do you cut on and which do you sew on, and why are they different for fleece and the same for felt?
- Before you sew the ears on, which way should they point, and why?
- Why does the pattern say to mark the opening on only one of the two body pieces?
- Your plush needs ten pages. What could you change, and what would that change about it?
Use it in your subject
Not a technology class? Then the app is how students show what they learned in your unit. More projects for every subject.
Family and consumer sciences
Addresses the national FCS standards 16.3.4 (demonstrate design concepts with technology using flat pattern making) and 16.3.7 (use technology for textile design), and 16.4.5 (basic skills for producing textile products) when the plush is sewn. The fabric choice speaks to 16.2.4 (how textile characteristics affect construction), and the list of what to buy to 16.5.2 (the cost of construction). It fits a soft goods project such as Utah's Sewing Construction and Textiles 1, as an extension of sewing from a commercial pattern.
Engineering and design
Partially addresses NGSS MS-ETS1-4: the stuffed preview is a model to test a design before cutting any fabric. ISTE 1.4.c (develop, test and refine prototypes) when a student sews one, measures it, and changes the next pattern.
Art
A character designed as a soft sculpture: its silhouette, its proportions and its face, made in felt.
Makerspace and sewing clubs
A first original pattern for a club that has sewn from kits, over a few weeks.
Practical notes
- AgesGrades 6 to 12, and younger with an adult for the sewing. Middle school usually sews felt by hand; high school can use fleece and machines.
- TimeDesigning, printing and taping the pattern fits about one period of forty-five minutes. Sewing it takes several more: the app guesses about seven periods by hand for the felt cat, fewer with a sewing machine. These are estimates; tell us how long it takes your class.
- EquipmentA computer or Chromebook with a modern browser and a printer. For sewing: felt (9 by 12 inch craft sheets fit the 8 inch starters), fleece or cotton, thread, a hand sewing needle, pins, fabric scissors, embroidery floss and polyester fiberfill. The app lists what each plush needs.
- CostFree. The app has no paid tier and no AI.
- PrepNone to try it or print. A free account adds saving. Print the first page yourself to check your printer, and sew one before the class if you can.
- In a groupEveryone designs their own plush. Sewing goes well in pairs, one holding and one stitching, when needles are scarce.
For co-ops, microschools, and classrooms
Design one period, sew over a week. Each student designs a creature and prints its pattern; the class sews in felt by hand, a step or two a day, following the printed order. A finished class set makes a good display or a gift drive for a children's hospital or shelter; a plush that is given away should use stitched or felt eyes, never safety eyes or buttons.
Common questions
Is Plush Pattern Maker free?
Yes. It runs in your browser and there is no paid tier. A free account adds saving. Printing works without one.
How do I print it at the right size?
Print the first page on its own. In the print window, Scale must say Default, 100 or Actual size, never Fit to page. Then measure the 1 inch square with a ruler: if it is smaller, the printer shrank the pattern. Change the setting before printing the rest.
Which fabric should we use?
Felt is the easiest first plush: it does not fray, it is cut on the line, and it is sewn on the outside with nothing to turn. Fleece is softer and stretchy; it is sewn inside out with a 1/4 inch seam allowance and turned. Cotton is thin and firm and sewn the same way as fleece.
Why is the pattern bigger than the plush?
Stuffing pulls the edges of a flat piece in, more across than up and down. The app draws the pattern about a tenth taller and more than that wider than the finished size. These are estimates, not measurements, and real fabric and stuffing vary: sew one and compare.
Can students draw any shape they like?
They pick a body shape and change its width, head and bottom, and pick from a few kinds of ears, arms, legs and tails, each with a size and a place along the edge. Every plush is made the same way: two body pieces sewn round the edge, an optional oval base, and the parts sewn into the seam. It does not make gussets, darts or jointed limbs, which is what keeps every design sewable for a beginner.
Is it safe for young children?
Stitched and felt faces are the default. Safety eyes are a choice in the Face tab; when they are chosen, the app warns and the pattern's first page says not for children under 3, because they are small parts. A plush that is sold, even at a fundraiser, falls under toy safety testing rules; one a student keeps or gives away does not.
Still have a question? Ask us, and a person will write back.
Where to go next
Start with Plush Pattern Maker
Trying it costs nothing and takes about five minutes. An account is what makes the work last.
Plush Pattern Maker is one of the making apps on the platform. It is a place to make things, not a course, and it is not a substitute for a teacher: it is at its best when an adult asks the questions above before the fabric is cut.
Page last reviewed November 2026.
Google, Google Classroom and Chromebook are trademarks of Google LLC.