3D Printer Simulator
Most students have never stood next to a 3D printer, and the part that matters happens inside the print where nobody can see it. This simulator shows all of it. It opens with a little house on the build plate: slice it into layers, press Print and watch the nozzle draw each one, then turn the infill up and see the inside go from an open grid to a dense mesh. Free, in the browser, no printer and no account needed.
Using this with a class? Make a free class and add your students yourself: each gets a username and password, with no email or Google account needed. Or give them one join code.A first lesson: Everyone slices the same house at 20% and at 60% infill, reads how many lines of G-code each makes, and argues which one they would actually print and why.
Set up a free classWhat a student actually does
They press Slice and the house turns into 165 flat layers, each 0.2 millimeters tall. They press Print, the bed and nozzle heat up, and the nozzle starts drawing: the outline of the walls first, then a solid floor, then a grid inside. They speed it up and watch the roof step inward a fraction of a millimeter per layer. Then they turn infill up to 60, slice again, and watch the inside fill with a much tighter grid.
From there it works like a real slicer. They can add their own STL files from their computer or a link, move, rotate and scale them on the build plate, and change layer height, infill, filament and quality. The G-code Viewer shows the actual instructions the printer follows, one line per move. Learning Mode builds a cube, cylinder or pyramid and lets them step through it one layer at a time, and finished models export as STL or GLB.
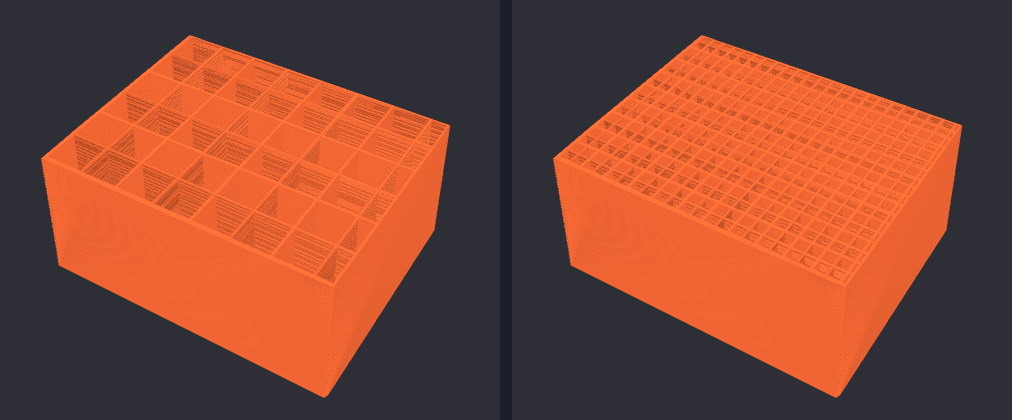
Same house, stopped at the same layer. On the left, 20% infill: a grid with a line every 4 millimeters each way. On the right, 60%: a line every 1.3 millimeters. The outside looks identical, but the right one uses far more plastic and takes much longer, and it is much harder to crush. Every real print is a choice between those.
What they are learning while they play
Nothing here is presented as a lesson. This is what the activity is made of.
| What the student does | What it is |
|---|---|
| Presses Slice | Slicing. A 3D model is only a skin of triangles. Slicing cuts it into flat layers and plans a path for the nozzle on each one. |
| Watches layers stack up | Additive manufacturing. Printing builds an object by adding material a layer at a time, where carving or milling removes it. |
| Turns infill from 20 to 60 | Infill and strength. Most prints are mostly air inside. More infill is stronger, heavier, slower and costs more plastic. |
| Looks closely at the roof | Resolution. A slope becomes a staircase of tiny steps. Thinner layers make the steps smaller and the print slower. |
| Opens the G-code Viewer | Machine instructions. The printer follows a plain list of moves like G1 X15 Y12, one line at a time. It is a program, just a very simple one. |
| Reads X, Y and Z on the status panel | 3D coordinates. Every move is a point in space. The nozzle goes back and forth in X and Y, and Z only goes up between layers. |
| Switches filament from PLA to PETG | Materials. Different plastics melt at different temperatures, so the nozzle and bed heat to different settings. |
| Loads their own model | Design for making. A model that looks fine on screen may float off the bed or need support. Printing is where design meets the real world. |
How to tell whether it landed
Ask, and let them show you. A student who has understood it can answer these without help.
- What does slicing do to a model, and why does a printer need it?
- Why is most of the inside of a print empty?
- The roof looks like stairs up close. How would you make it smoother, and what would it cost?
- What is one line of G-code telling the printer to do?
- You need a part that will not snap. What would you change, and what gets worse?
Practical notes
- AgesAges 9 through high school. Younger students slice and watch; older ones tune settings, read the G-code and bring their own models.
- TimeA minute to the first layer. A satisfying session is twenty to forty minutes.
- EquipmentAny computer or Chromebook with a modern browser. No 3D printer. Nothing to install.
- CostFree. The app has no paid tier.
- PrepNone. Open the page and go. Reading this page first takes about three minutes.
- In a groupEveryone can slice the same house with different settings and compare line counts and print times.
For co-ops, microschools, and classrooms
Most groups have no 3D printer, and the ones that do have a single machine and a queue. Here every student gets a printer. Slice the same house at different settings, compare what comes out, and save the real printer for the parts that have been thought through.
- Works with any STL file, including models students make in other apps.
- Learning Mode steps through a print one layer at a time.
- The G-code Viewer shows every instruction the printer receives.
- No install, no per-seat license. Student work is private by default.
Common questions
Is the 3D Printer Simulator free?
Yes. It runs in your browser and there is no paid tier. A free account adds saving, but nothing on this page is behind a paywall.
Do we need a 3D printer?
No. That is the point of it. Everything a printer does is shown on screen, including the parts you cannot see on a real one, like the infill inside a print.
Does my child need an account to try it?
No. The demo on this page is the complete simulator with a starter house. Make a free account and the project comes with you as your first save.
Can they print their own designs?
Yes. Any STL file can go on the build plate, from their computer or a link. The simulator slices and prints it the same way it does the house.
What ages is it for?
Ages 9 through high school. Watching a print works for anyone; reading G-code and choosing settings suits older students.
What subject can I log this as?
Most families log it as engineering or technology. Slicing, infill and materials are manufacturing, G-code and coordinates are computing, and designing for a printer is design. The table above lists specifically what is covered, so you can pick the label your records need and point at the evidence.
Where to go next
Start with 3D Printer Simulator
Trying it costs nothing and takes about five minutes. An account is what makes the work last.
The 3D Printer Simulator is one of the making apps on the platform. It is a place to make things, not a course, and it is not a substitute for a teacher: it is at its best when an adult asks the questions above and takes the answers seriously.
Page last reviewed September 2026.