SketchForge
Most things that come out of a 3D printer were designed the same simple way: stack a few basic shapes, turn some of them into holes, and group them so the holes cut away. SketchForge is a beginner 3D design tool built on that idea. It opens on a pencil cup that is not finished yet, a solid cylinder with a see-through hole inside it. Select both, press Group, and it becomes a hollow cup you could print. Free, in the browser, no account needed to try it.
Using this with a class? Make a free class and add your students yourself: each gets a username and password, with no email or Google account needed. Or give them one join code.A first lesson: Everyone designs a desk organizer with at least two holes of different shapes, then trades with a partner who has to explain how each cut was made.
Set up a free classWhat a student actually does
They see a blue cylinder with a ghostly grey one poking out of the top. They drag a box around both, press Group, and the grey one vanishes and takes the middle of the blue one with it: a hollow pencil cup with a floor and a rim. The idea clicks at once, because they watched it happen.
From there it is a real beginner CAD tool. Boxes, cylinders, spheres, cones, pyramids, wedges, roofs, half spheres, tori, tubes and 3D text, each one either a solid or a hole. Shapes can be resized to the millimeter, rotated, aligned, mirrored, dropped onto the workplane and snapped to a grid, and groups can be taken apart again. A finished design exports as STL or OBJ, the files 3D printers and slicers read.
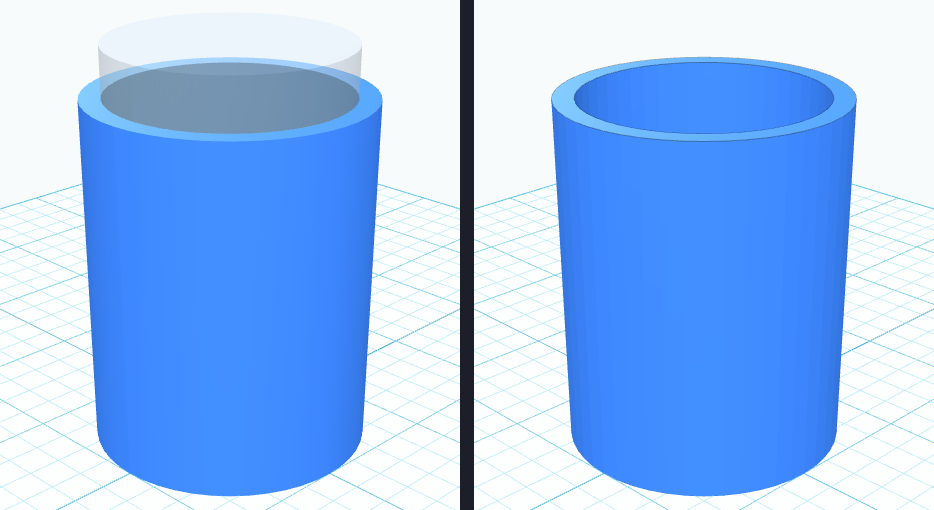
Before and after one click. On the left, two shapes: a solid cylinder and a slightly thinner hole, raised 3 mm so the cup keeps a floor. On the right, the same two shapes grouped: the hole has been subtracted from the solid. Designers call this a boolean operation, and nearly every printed part, from phone stands to replacement knobs, is built out of them.
What they are learning while they play
Nothing here is presented as a lesson. This is what the activity is made of.
| What the student does | What it is |
|---|---|
| Groups a hole with a solid | Boolean operations. Adding and subtracting shapes is how most real parts are designed. A hole is a shape that takes material away. |
| Raises the hole 3 mm off the workplane | Designing for the real world. Without that gap the cup would have no floor. Small numbers decide whether a design works. |
| Types exact sizes in millimeters | Measurement. Real objects have to fit. A pencil is about 7 mm across, so a pencil hole needs to be a little bigger. |
| Turns the view with the view cube | Spatial reasoning. A shape that looks right from the front can be wrong from above. Designers check every side. |
| Uses Align and the grid | Precision. Lining parts up exactly is the difference between a clean part and one that will not print. |
| Builds with simple primitives | Decomposition. Complicated objects are made of simple shapes. Seeing the boxes inside a design is how engineers think. |
| Ungroups to change a part | Editable designs. The original shapes are kept inside a group, so a design can be taken apart and changed later. |
| Exports an STL | 3D printing files. An STL is the surface of the object as triangles, the file every slicer and 3D printer understands. |
How to tell whether it landed
Ask, and let them show you. A student who has understood it can answer these without help.
- What happened to the grey cylinder when you grouped?
- Why is the hole raised off the workplane?
- How would you add a slot on the side for a ruler?
- Make a hole exactly the right size for a pencil. How big did you make it?
- Name something in your house that was probably designed out of simple shapes.
Practical notes
- AgesAges 8 through high school. Younger students stack and cut shapes; older ones design to measurements and export for printing.
- TimeA minute to the first cut. A small useful object, like a desk organizer or a keychain, takes thirty to sixty minutes.
- EquipmentA computer or Chromebook with a modern browser and 3D graphics (WebGL). A mouse makes it much easier. Nothing to install, and no 3D printer needed to design.
- CostFree. The app has no paid tier.
- PrepNone. Open the page and go. Reading this page first takes about three minutes.
- In a groupEveryone can design an object to the same measurements, like a stand that fits a specific phone, and compare approaches.
For co-ops, microschools, and classrooms
Give the room a real problem with a measurement, a stand for a 75 mm wide phone or a holder for exactly six pencils, and let them design it. Check the designs in the 3D printer simulator, then print the best ones if you have a printer.
- Solid and hole shapes, groups, align, mirror and a snap grid.
- Sizes to the millimeter, for designs that fit real objects.
- Exports STL and OBJ for any 3D printer or slicer.
- No install, no per-seat license. Student work is private by default.
Common questions
Is SketchForge free?
Yes. It runs in your browser and there is no paid tier. A free account adds saving and keeping exported files, but nothing on this page is behind a paywall.
Is it like Tinkercad?
It works the same way: build from basic shapes, turn some into holes, and group them. SketchForge is a separate open-source project and is not affiliated with Autodesk or Tinkercad.
Does my child need an account to try it?
No. The demo on this page is the complete app with a starter pencil cup. Make a free account and the design you made comes with you as your first project.
Can they 3D print what they design?
Yes. Export an STL and send it to any 3D printer or printing service. No printer at home? Try it in the platform's 3D printer simulator first.
What ages is it for?
Ages 8 through high school. Stacking and cutting shapes works for younger students; designing to exact measurements suits older ones.
What subject can I log this as?
Most families log it as engineering or technology. Boolean design, measurement and precision are engineering, and spatial reasoning and decomposition are math. The table above lists specifically what is covered, so you can pick the label your records need and point at the evidence.
Where to go next
Start with SketchForge
Trying it costs nothing and takes about five minutes. An account is what makes the work last.
SketchForge is one of the making apps on the platform. It is a place to make things, not a course, and it is not a substitute for a teacher: it is at its best when an adult asks the questions above and takes the answers seriously.
Based on SketchForge 3D by Formsmith746, used under the MIT license. Source.
Page last reviewed September 2026.